
Installation of Select.live with SP PRO
Introduction
Thank you for
purchasing Select.live. This product will allow you to monitor your SP PRO
system wherever you have an Internet connection.
This instruction
will show how to install the Select.live (Order code 005283) for the SP PRO.
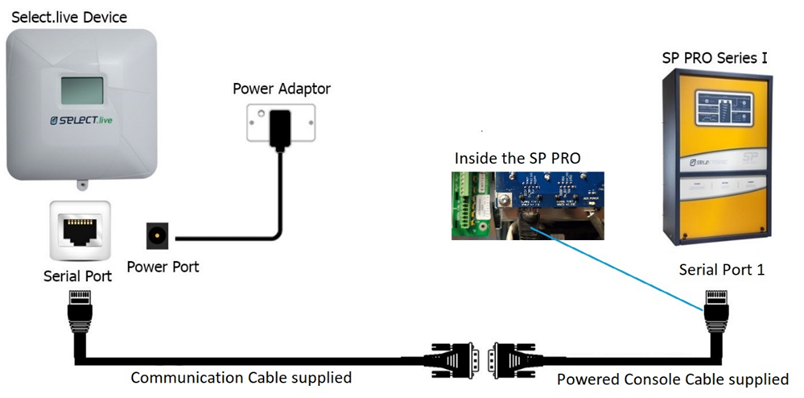
The SP PRO series I also needs Select.live Adaptor Kit (Order code 005290).
This product is suitable
for single phase or Advanced Multiphase (three phase and split phase) systems.
For more
information view Select.live/monitoring
Contents of Packing
Select.live (Order code: 005283)

Position | Quantity | Description |
A | 1 | Select.live |
B | 1 | Wall Mount Plate |
C | 1 | Communication Cable |
D | 4 | Wall Mount Screws and wall anchors |
E | 2 | Double Side Mounting Strip |
F | 2 | Small screw |
Select.live Adaptor kit for SP PRO Series I (Order code: 005290)
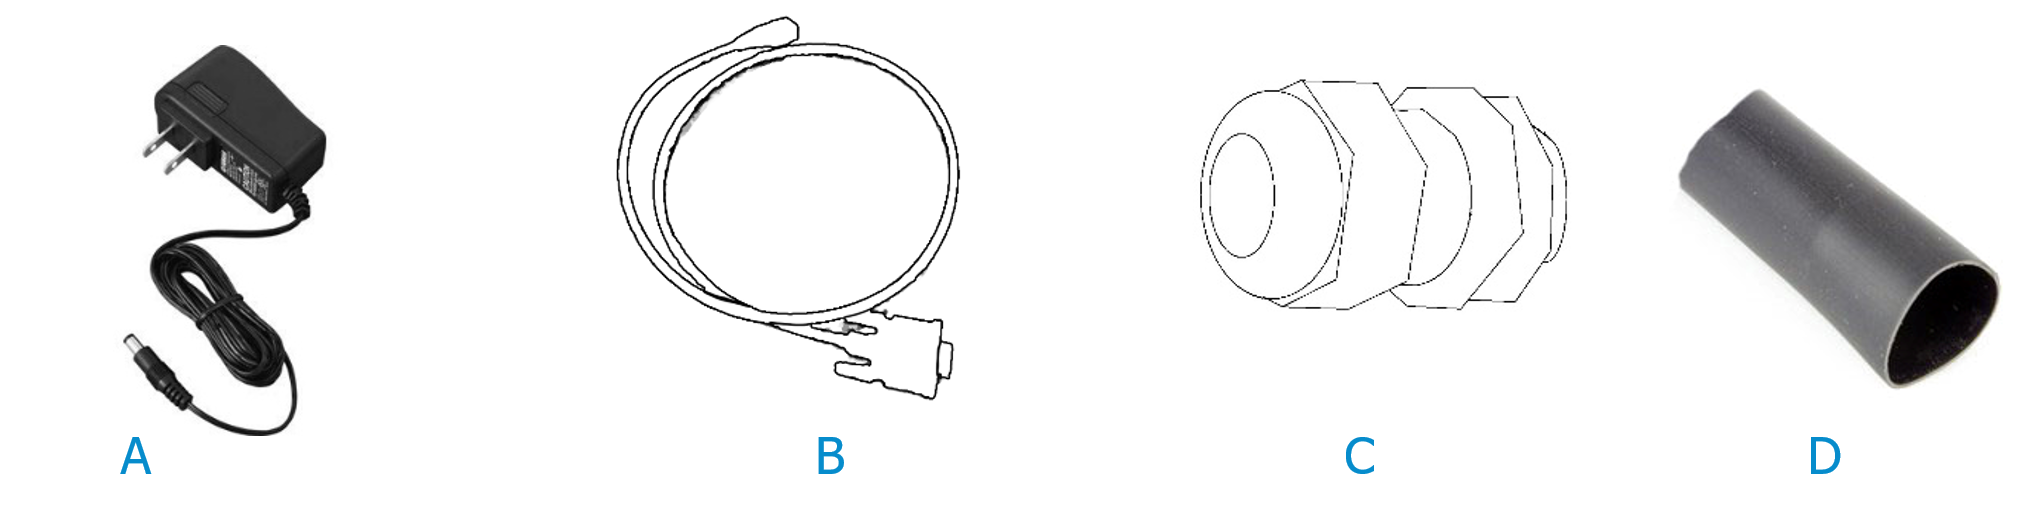
Position | Quantity | Description |
A | 1 | 12V DC power adaptor |
B | 1 | Powered Console cable |
C | 1 | 25mm Gland |
D | 1 | 70mm long Wire Sleeve |
Installation of the Select.live
a. The ambient conditions at the mounting location must be suitable for the operation of the Select.live (see “Specification” section)b. The mounting location must have access to your Wi-Fi network if you are using a wireless connection for internet access.
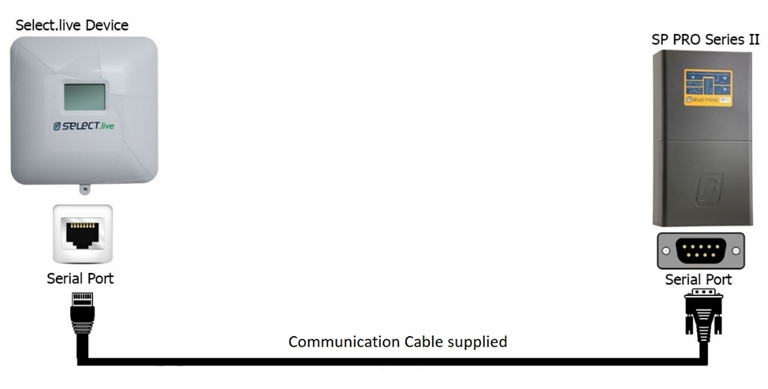
For SP PRO Series I inverter, you must purchase the Select.live
Adaptor kit for SP PRO Series I (Order code: 005290).
Select.live setup for Internet
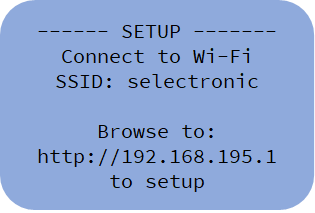
2. From your computer or mobile, connect to the Select.live
using Wi-Fi SSID: “selectronic” with no password.
3. To setup the Select.live, open a web browser and
enter http://192.168.195.1/. The web link
will then direct you to the Select.live setup web interface.
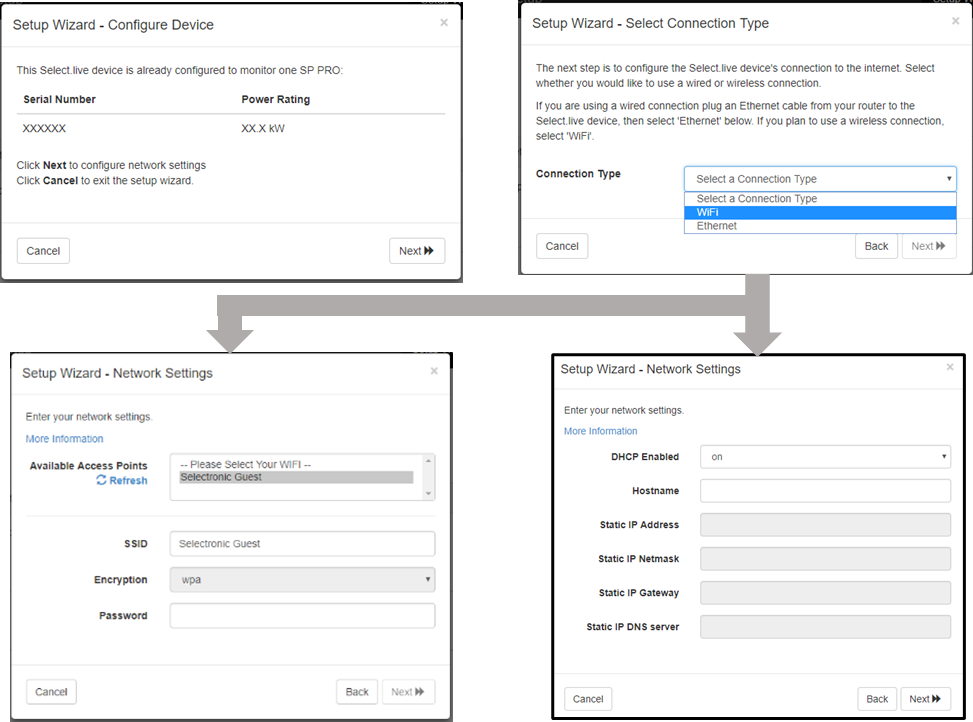
4. Click
on the “Setup Wizard” button to auto-detect the SP PRO. Select your preference
of Wi-Fi or Ethernet connection.
- If Wi-Fi is selected, then provide your Wi-Fi SSID and password to connect the Internet.
- If Ethernet is
selected, choose DHCP Enabled ON or OFF. For DHCP Enabled OFF, you must provide
static IP, Netmask, Gateway and DNS address to connect to the Internet.
Note: If
Ethernet is selected, connect a network cable from the Select.live to the modem
or router after the Setup Wizard is completed.
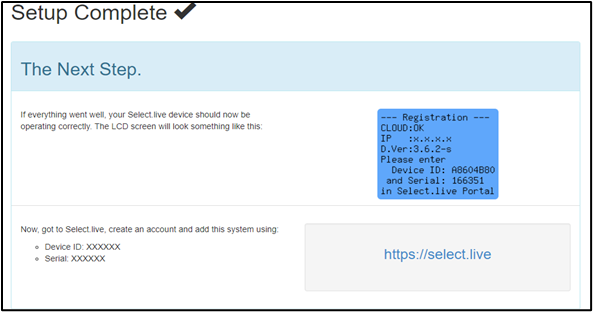
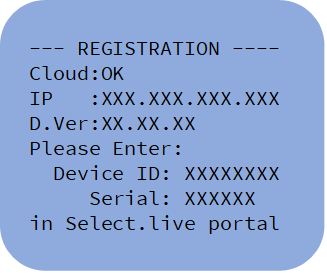
5. Once
the Select.live Setup Wizard is complete, wait approx. 30 seconds and then the
following display will appear on the Select.live display screen. Your Select.live
is now ready to register for the Select.live Portal using Device ID and Serial.
6. Note
down the Device ID and Serial. This will be used for Select.live Portal
registration.
7. Note:
If Ethernet is selected, connect a network cable from the Select.live to the
modem or router after the Setup Wizard is completed.
Select.live Portal Registration
A verification email will be sent to you. Follow the instructions to activate the account.
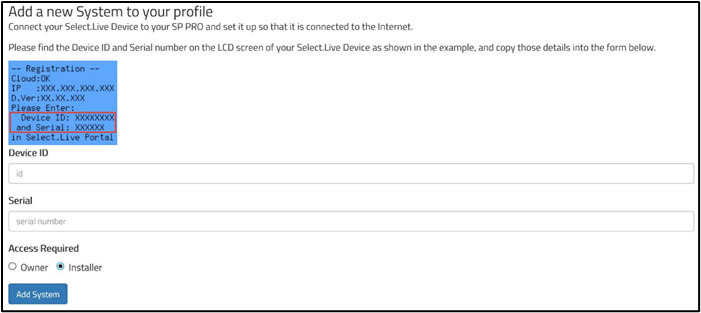
2. Log in to
your account and register your Select.live by clicking “Add a system”.
5. Congratulations, you have successfully completed
the setup for Select.live. Now you will
be able to see your SP PRO system in the Select.live Portal’s Systems page.
Granting Access to your installer
If you wish to allow your installer to also have access to your
system then you must grant your installer access. By default, your installer
will not have access to your system.
1. Select the system that you wish to grant
installer access.
2. Go to the “Settings” menu and under SYSTEM
SETTINGS check the box “Allow installer access”. Once the installer has added access
to their login their name will appear beside this setting.
3. Give your installer the Device ID and Serial.
If you are the Installer then the system will be listed
under OTHER SYSTEMS.
Select.live is successfully added to Select.live Portal.
Monitoring
of the system
- System
Page: This is the home page where all the systems are listed and a new
system can be added. By clicking on System Name, the system’s Dashboard page
can be viewed.
- Dashboard
Page: This page shows the power flow animation, Load Powered By, System
info, environment contribution and energy chart of the selected system from the
System page.
- Event
Page: This page shows historical and current events the selected system
from the System page.
- Settings
Page: This Page allows users to change system name and solar size; and
delete selected system.
- My
Profile Page: This Page allows users to change user detail and account
password.
- Select.Live
– Remote Connection : Click here to view the SP LINK Manual
Specification
Physical | |
Dimensions | 150mm x 150mm |
Weight | 315g |
LCD display | 128px x 64px |
Housing material | UV stabilized PC+ABS |
IP rating | IP43 |
Operating temperature | -10 to 70°C |
Operating humidity | 5 to 95% humidity |
Technical | |
Wireless | 802.11b/g/n Wi-Fi 2.4GHz |
Wireless range | 100m max, line of sight. Several factors could
reduce this range. |
Wired connectivity | Serial RS232, 10/100 Ethernet |
Wired connection length | Up to 5m for Serial RS232 |
Outbound ports. (If you are behind a corporate firewall check
with your administrator that these outbound ports are open). | Service Protocol Port HTTPS TCP 443 Secure Tunnel (VPN) UDP 11789 Network Time UDP 123 |
Power Supply | |
Power Method | DC adaptor or Communication cable (Power over
serial) |
Rating | 6V to 24V, 1A Max |
Using Internal RJ45 Serial Port
The Select.Live unit comes standard with the ability to
connect to the external DB9 port. You
may also use the internal port by making a cable with the following connections.

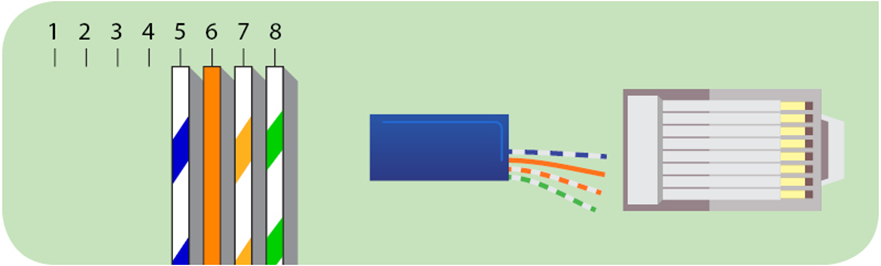
Select.live RJ45
Connect as shown below for the Green Communications Card. Connect and configure as shown for the
Blue/Black Communication cards:

Blue/Black
Card Configuration
Troubleshooting
Setup problem
1. I could not find the “selectronic” Wi-Fi SSID.
Cause:
- Your Select.live is not powered ON
- Wi-Fi of your Select.live is connected to a network
Solution:
- Make sure your SP PRO is turned ON
- Check the power connection to the Select.live
and check if any text is displayed on the screen to indicate the device is ON.
- Factory reset your Select.live to reset the Wi-Fi connection and use the Setup Wizard to
connect to the Internet.
2. How do I factory reset the Select.live?
Press
and hold the Select.live’s Reset button
for 10 seconds. The device will start up again after about a
minute. You will need to remove the unit from the wall to access the Reset
button.
3. My Select.live could not auto-detect SP PRO.
Cause:
- The connection between the SP PRO and the Select.live is not correct.
- Your SP PRO login password is different to the default
password “Selectronic SP PRO”
Solution:
- Check your connection between SP PRO and Select.live
as per the instructions.
- Enter the SP PRO login password during the Setup
Wizard and click AutoDetect to check.
4. The Select.live portal could not connect to my Select.live.
Cause:
- Your Select.live is not setup
- Your Select.live is not connected to any
network. Select.live shows “Cloud:No LAN” and “IP: Unknown”
- Your Select.live is connected to a network but does
not have an Internet connection. Select.live
shows “Cloud:ERROR” and “IP:” as X.X.X.X format.
Solution:
- Run the Setup Wizard from the Select.live web
interface.
- Check your Select.live display screen. If
“Cloud: OK” is displayed on the device’s screen then the Internet is connected
to the device. Otherwise run the Setup Wizard from Select.live web interface to
re-establish the Internet connection.
5. I could not find Device ID and Serial
number.